[726] Kom Ombo.
Ajouter au presse-papier
-Temple of Kom Ombo (from the back of the monument).
-Also labels for 'Pylon.' and 'Temple.'.
This photograph is in a section titled 'X Kom Ombo. Philae.'.
[703] [Rock-texts]
Ajouter au presse-papier
-Wadi el-Shatt el-Rigal: rock-inscriptions, including including 396 and 401.
This photograph is in a section titled 'VIII Soba Rigaleh, inscrips.'.
[700] Valley of the Soba Rigaleh cont?
Ajouter au presse-papier
-Wadi el-Shatt el-Rigal: rock-inscriptions (nos 358-365?).
-Also labels for 'Am' and 'Two attendants leading in ibexes.'.
This photograph is in a section titled 'VIII Soba Rigaleh, inscrips.'.
Note: This photograph is numbered '700 - continuation of 699'.
[419 E.E.Fund] Egyptians Old Kingdom
Ajouter au presse-papier
-Bulaq Museum: two seated statues belonging to Gegi (Saqqara; Cairo, Egyptian Museum CG 70, 71 or 72; Old Kingdom, 6th Dynasty).
This photograph is in a section titled 'Bulak & El Kab.'.
[418 E.E.Fund] Egyptians Old Kingdom.
Ajouter au presse-papier
-Bulaq Museum: two seated statues belonging to Gegi (Saqqara; Cairo, Egyptian Museum CG 70, 71 or 72; Old Kingdom, 6th Dynasty).
This photograph is in a section titled 'Bulak & El Kab.'.
[411 E.E.Fund] Egyptian, Old Kingdom
Ajouter au presse-papier
-Wooden statue of a woman usually considered as a depiction of Ka-aper's wife (Saqqara, mastaba C8; Cairo, Egyptian Museum CG 33; Old Kingdom, 5th Dynasty).
This photograph is in a section titled 'Bulak & El Kab.'.
[855] Coffins XXIV-VI dyn
Ajouter au presse-papier
-Kom Medinet Ghurab (‘Gurob’): Late Period coffins.
This photograph is in a section titled 'XIV'.
[854] Coffins XXIV-VI dyn.
Ajouter au presse-papier
-Kom Medinet Ghurab (‘Gurob’): Late Period coffins.
This photograph is in a section titled 'XIV'.
[850] Scarab & wings, bead work.
Ajouter au presse-papier
-Mummy beadwork portraying a winged scarab.
This photograph is in a section titled 'XIV'.
[611] Capitals in rock tomb. Tell el Amarna.
Ajouter au presse-papier
-Rock tomb at El-Amarna (tomb 8 belonging to Tutu): columns and capitals.
This photograph is in a section titled 'I Zawyet el Meitin. to Kusae.'.
[606] Coptic inscriptions Beni Hasan
Ajouter au presse-papier
-Beni Hasan: Remains of tomb scene, two men with a balance, and Coptic graffiti.
This photograph is in a section titled 'I Zawyet el Meitin. to Kusae.'.
[602] Quarries N. of Zawyet el Meitin.
Ajouter au presse-papier
-Quarries north to Zawiyet el-Maiyitin.
This photograph is in a section titled 'I Zawyet el Meitin. to Kusae.'.
[827] Sakiyeh.
Ajouter au presse-papier
-A saqiya, a mechanical water lifting device (in the Faiyum?).
This photograph is in a section titled 'XIII'.
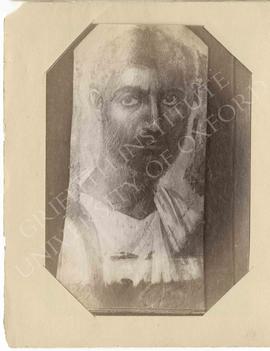
Portraits found 1888, kept at Bulak
Ajouter au presse-papier
-Hawara: two Roman funerary portraits ('Faiyum mummy portraits') (Cairo, Egyptian Museum, CG 33236).
This photograph is in a section titled 'XV'.
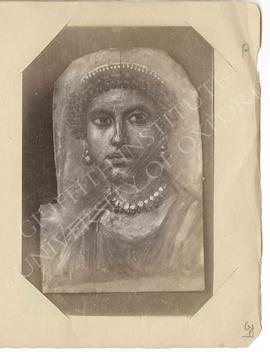
Portraits found 1888, kept at Bulak
Ajouter au presse-papier
-Hawara: two Roman funerary portraits ('Faiyum mummy portraits') (Cairo, Egyptian Museum, CG 33241).
-Also pencil note 'P'.
This photograph is in a section titled 'XV'.
[859] Coffin heads. XXV dyn.
Ajouter au presse-papier
-Kom Medinet Ghurab (‘Gurob’)(?): Upper parts of anthropoid coffin lids.
This photograph is in a section titled 'XV'.
[940] Recesses in building, seen in forecourt.
Ajouter au presse-papier
-Temple of Qasr el-Sagha: interior, with locals lying in the place.
This photograph is in a section titled 'Back of Birket Karun 928-940'.
[938] Corner of building, shewing unfinished back.
Ajouter au presse-papier
-Temple of Qasr el-Sagha: detail of one corner of the monument.
This photograph is in a section titled 'Back of Birket Karun 928-940'.
[935] Statues at Dimay. Ptolemaic?
Ajouter au presse-papier
-Dimai (Soknopaiou Nesos): remains of statues maybe dated to the Ptolemaic period.
This photograph is in a section titled 'Back of Birket Karun 928-940'.
[936] Building in the desert, north of the Birket Karun
Ajouter au presse-papier
-Temple of Qasr el-Sagha (near Dimai, Faiyum).
This photograph is in a section titled 'Back of Birket Karun 928-940'.
[934] Ruins of Dimay.
Ajouter au presse-papier
-The ruins of the town of Dimai (Soknopaiou Nesos).
This photograph is in a section titled 'Back of Birket Karun 928-940'.
[933] Dimay, nearer.
Ajouter au presse-papier
-Landscape in the Faiyum, with the ruins of Dimai (Soknopaiou Nesos) in the background.
This photograph is in a section titled 'Back of Birket Karun 928-940'.
[931] Dimay, north of Birket Karun from the S.
Ajouter au presse-papier
-Landscape in the Faiyum, with the ruins of Dimai (Soknopaiou Nesos) in the background.
This photograph is in a section titled 'Back of Birket Karun 928-940'.
[932] In Dimay, looking along the quay ruins
Ajouter au presse-papier
-The town of Dimai (Soknopaiou Nesos): the quay and the processional way.
-Also label for 'quay'.
This photograph is in a section titled 'Back of Birket Karun 928-940'.
[920] Same canal & debris: looking N.
Ajouter au presse-papier
-Hawara: canal cutting through the funerary temple of Amenemhat III (the so-called Labyrinth), with remains of blocks from the monument.
This photograph is in a section titled 'Hawara Canal 917-930'.
[919] Canal: shewing white chip debris of labyrinth.
Ajouter au presse-papier
-Hawara: canal cutting through the funerary temple of Amenemhat III (the so-called Labyrinth), with remains of blocks from the monument.
This photograph is in a section titled 'Hawara Canal 917-930'.
[918] Same canal, & blocks
Ajouter au presse-papier
-Hawara: canal cutting through the funerary temple of Amenemhat III (the so-called Labyrinth), with blocks from the monument.
-With an arrow pointing at blocks.
This photograph is in a section titled 'Hawara Canal 917-930'.
[917] Canal at Hawara cutting through Labyrinth
Ajouter au presse-papier
-Hawara: canal cutting through the funerary temple of Amenemhat III (the so-called Labyrinth), with blocks from the monument.
This photograph is in a section titled 'Hawara Canal 917-930'.
![[726] Kom Ombo.](/uploads/r/null/9/a/f/9af23571facd36fe60dac44673be13270b2daced9863d9a7da686eaf3e030076/Petrie_5_8_111_lower_res600ppi_142.jpg)
![[703] [Rock-texts]](/uploads/r/null/c/2/5/c255b10432b300e9fae09c2e3becef045f231c5560ac0ed448cce99d2f5d9346/Petrie_5_8_103_lower_res600ppi_142.jpg)
![[700] Valley of the Soba Rigaleh cont?](/uploads/r/null/0/4/5/0453de6f5fe84fa10ce254b3f6c52d2fd917f7a36245140e9741a5d39b466f83/Petrie_5_8_102_upper_res600ppi_142.jpg)
![[419 E.E.Fund] Egyptians Old Kingdom](/uploads/r/null/e/6/c/e6cad51e6edd11d25d707a04ba0167edd4e078250e69fdb3d88450e22caa712d/Petrie_5_8_083_lower_res600ppi_142.jpg)
![[418 E.E.Fund] Egyptians Old Kingdom.](/uploads/r/null/9/d/3/9d39d3b93cab669642c0a46379931a23223f293adaa29063072cf52d903c2688/Petrie_5_8_083_upper_res600ppi_142.jpg)
![[411 E.E.Fund] Egyptian, Old Kingdom](/uploads/r/null/7/a/a/7aaa69f13ab4966ef05ba9fbbac8ba84940efd461333e677c36c723ae8e44cd9/Petrie_5_8_082_upper_res600ppi_142.jpg)
![[855] Coffins XXIV-VI dyn](/uploads/r/null/3/7/5/375de455240c594643f772bf921c8b4562793e43662a45954f692aea6697790a/Petrie_5_8_075_upper_res600ppi_142.jpg)
![[854] Coffins XXIV-VI dyn.](/uploads/r/null/d/a/f/daf71c9eec780de28a20341752d06ff7bd8fea08489d4711006fa0002e97e308/Petrie_5_8_074_lower_res600ppi_142.jpg)
![[852] One of the brick archways, XII dyn.](/uploads/r/null/5/1/3/5131ae22c2f9c9ae61b53c01c2abd98a6016df8548b7e791bc7c88efe19819ef/Petrie_5_8_073_lower_res600ppi_142.jpg)
![[850] Scarab & wings, bead work.](/uploads/r/null/4/b/9/4b96927896f80ffdb9b3c3fadb833bb7a77aa23dcea40d0dba14ac4f581277c5/Petrie_5_8_072_lower_res600ppi_142.jpg)
![[611] Capitals in rock tomb. Tell el Amarna.](/uploads/r/null/f/6/9/f69d9a660881b192f9b19eb73217b39f5e11582ee402e3f3712f4a548073c566/Petrie_5_8_063_lower_res600ppi_142.jpg)
![[606] Coptic inscriptions Beni Hasan](/uploads/r/null/a/0/1/a014f7498085c0c7b2fee9d218916e3bc0f94ce4345d40754f3962fe0f7be390/Petrie_5_8_062_upper_res600ppi_142.jpg)
![[602] Quarries N. of Zawyet el Meitin.](/uploads/r/null/7/c/f/7cf9f45c1f684f7d086d1f5dd7d5c02ef2f37a8009143df721937ab090e00c10/Petrie_5_8_058_lower_res600ppi_142.jpg)
![[827] Sakiyeh.](/uploads/r/null/1/e/8/1e86d483cc6b69a84377af6c06bd755eec0799686d36f8d9e100ce66f17742bb/Petrie_5_8_050_lower_res600ppi_142.jpg)
![[859] Coffin heads. XXV dyn.](/uploads/r/null/2/0/4/20433860bb75aea9d5058f5317b8323502b71ff6158610f764acf499a9fe010d/Petrie_5_8_035_upper_res600ppi_142.jpg)
![[940] Recesses in building, seen in forecourt.](/uploads/r/null/3/5/7/35736527f738d84ef401c8b767715d67489eb8f5872099d717aeac8eff878fb8/Petrie_5_8_031_lower_res600ppi_142.jpg)
![[939] Recesses in building, seen from top of wall.](/uploads/r/null/7/0/7/707db21ef21df008af357cf28e7e2546dcc622ff9f71e51693ed098ac60c11e6/Petrie_5_8_031_upper_res600ppi_142.jpg)
![[938] Corner of building, shewing unfinished back.](/uploads/r/null/b/f/d/bfd153aa7ef6e411348f1031e2e823def0320675ed4aca90221ebd3f8638c237/Petrie_5_8_030_lower_res600ppi_142.jpg)
![[935] Statues at Dimay. Ptolemaic?](/uploads/r/null/c/1/9/c199aa3ce552925b73fec86a7eb64b3e28430bd3c521e019483d981a3dd45efc/Petrie_5_8_029_upper_res600ppi_142.jpg)
![[936] Building in the desert, north of the Birket Karun](/uploads/r/null/6/0/e/60e14ebfa1f99bed454d3148e36832f4d1af4d0e187fb5389605cf0ea7b0ec85/Petrie_5_8_029_lower_res600ppi_142.jpg)
![[934] Ruins of Dimay.](/uploads/r/null/5/e/a/5eaaf8ed80378b8d2f1e4699a59d9318d9b0685e573ca93f8e37f2f575de7d29/Petrie_5_8_028_lower_res600ppi_142.jpg)
![[933] Dimay, nearer.](/uploads/r/null/4/2/a/42a9f31fa1a29dd10ac932d4f625995b9cee46f0d51beb7bab1031488d6d7006/Petrie_5_8_027_lower_res600ppi_142.jpg)
![[931] Dimay, north of Birket Karun from the S.](/uploads/r/null/2/2/f/22f021653648c569bcf6ca10003f66da36ef937b4ae26993f43ad23700bf6478/Petrie_5_8_027_upper_res600ppi_142.jpg)
![[932] In Dimay, looking along the quay ruins](/uploads/r/null/4/1/9/4194c91f08c303aa8b0f98c53000159d913b369a5b71a118f0998c9a050ca9da/Petrie_5_8_028_upper_res600ppi_142.jpg)
![[920] Same canal & debris: looking N.](/uploads/r/null/2/9/0/2906a9c85b7299fde429b4cae2566c2126371dfe2967688b08eb4251a56db0c0/Petrie_5_8_019_lower_res600ppi_142.jpg)
![[919] Canal: shewing white chip debris of labyrinth.](/uploads/r/null/c/8/1/c815550dc194bb2b21e85ffa9f027ebf29f599e047adf68b39281ce4b09f8e0e/Petrie_5_8_019_upper_res600ppi_142.jpg)
![[918] Same canal, & blocks](/uploads/r/null/9/f/d/9fd0d5fc8f6b356ea0be5647e43a50e0db27e520f4b6777dec07279047185126/Petrie_5_8_018_lower_res600ppi_142.jpg)
![[917] Canal at Hawara cutting through Labyrinth](/uploads/r/null/0/f/b/0fb8c86c15b53d1d4cc075f5bbff236ff160f6a622b759e1801d0ab5d5861fdd/Petrie_5_8_018_upper_res600ppi_142.jpg)